How-to Guides
1.
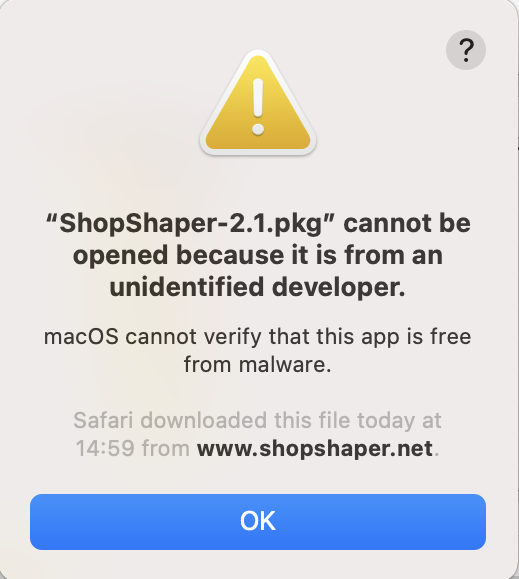
After downloading either ShopShaper-2.1.pkg for MacOS or ShopShaper-2.1.exe for Windows you will have to double-click on the file to start the installation process. The installation software will guide you through the process.
On MacOS machines you will most likely get the following message, because ShopShaper is not distributed through the AppStore.
2.
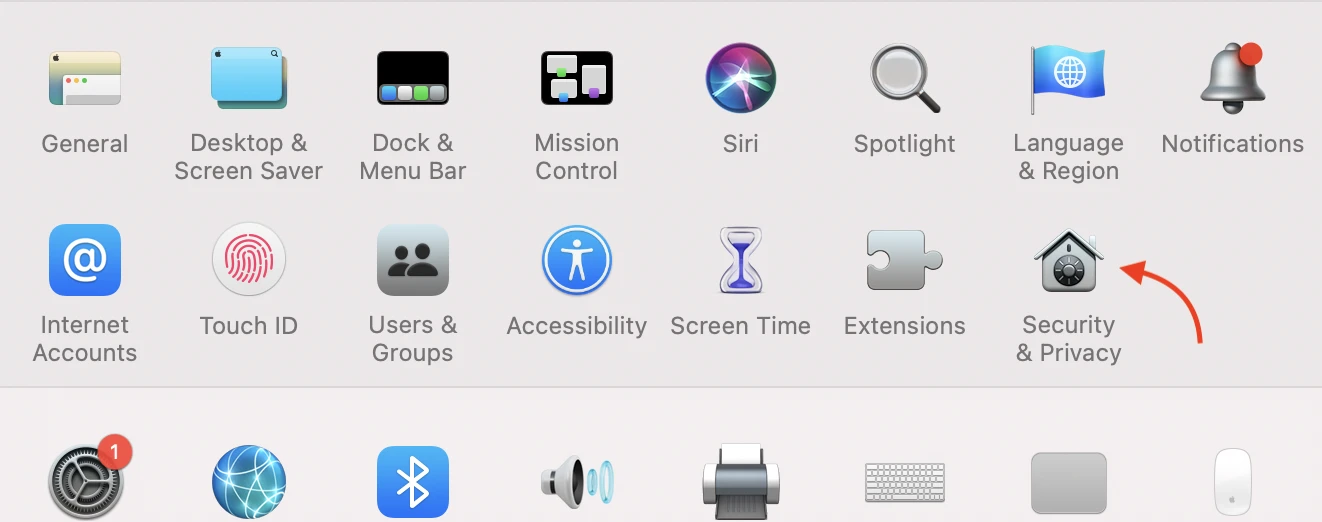
To install ShopShaper regardless, please click on the settings icon on your computer.

3.
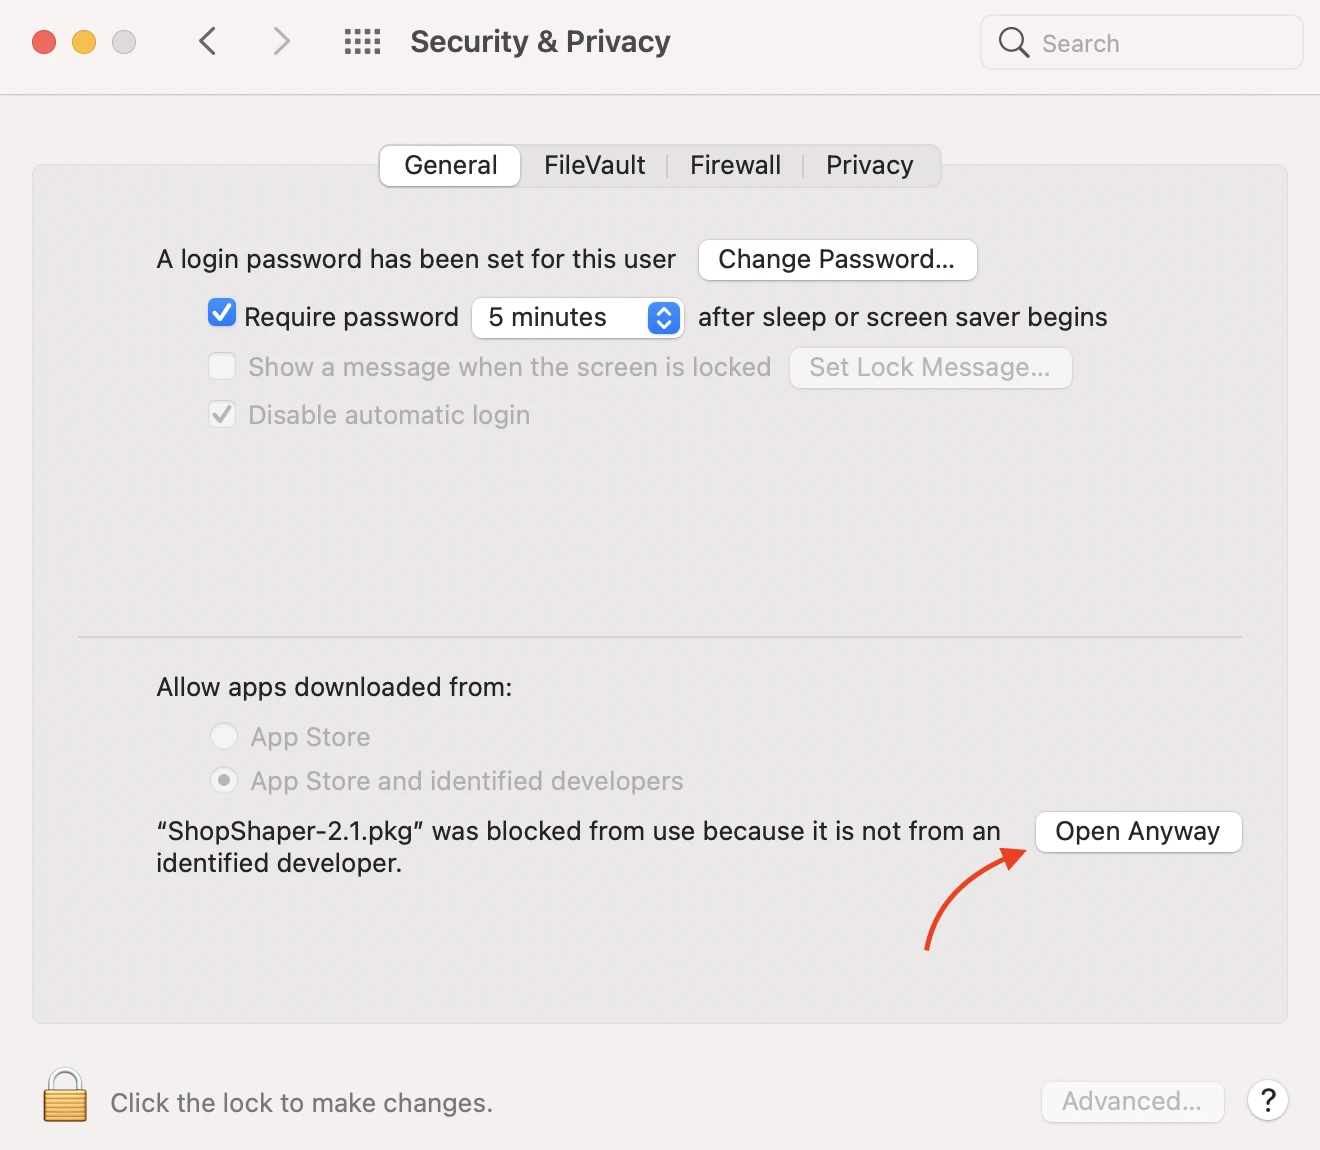
Click on the icon for "Security & Privacy".
4.
Click on "Open Anyway" to start the installation process and proceed.
1.
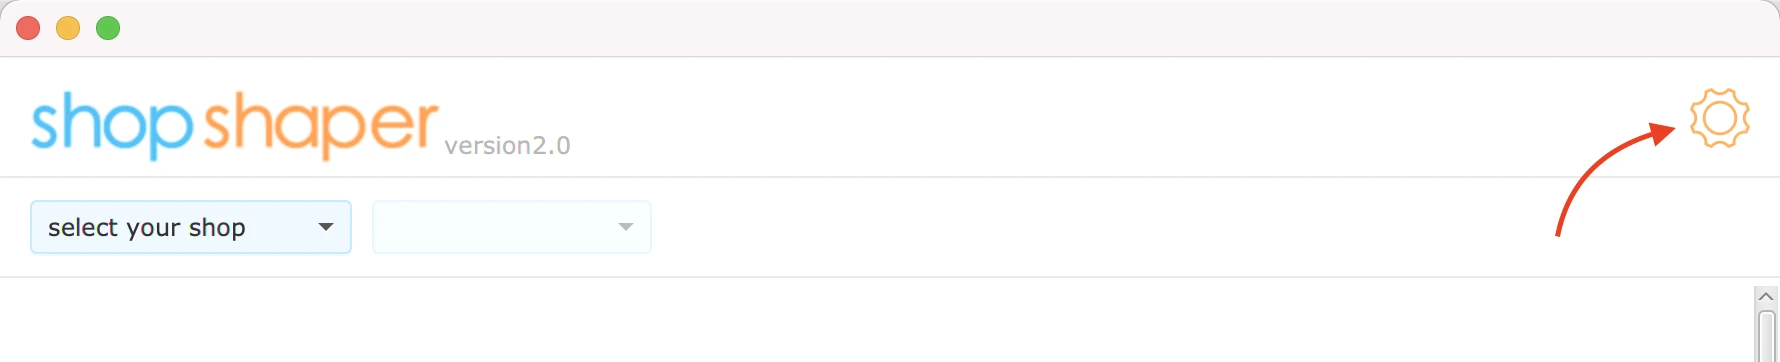
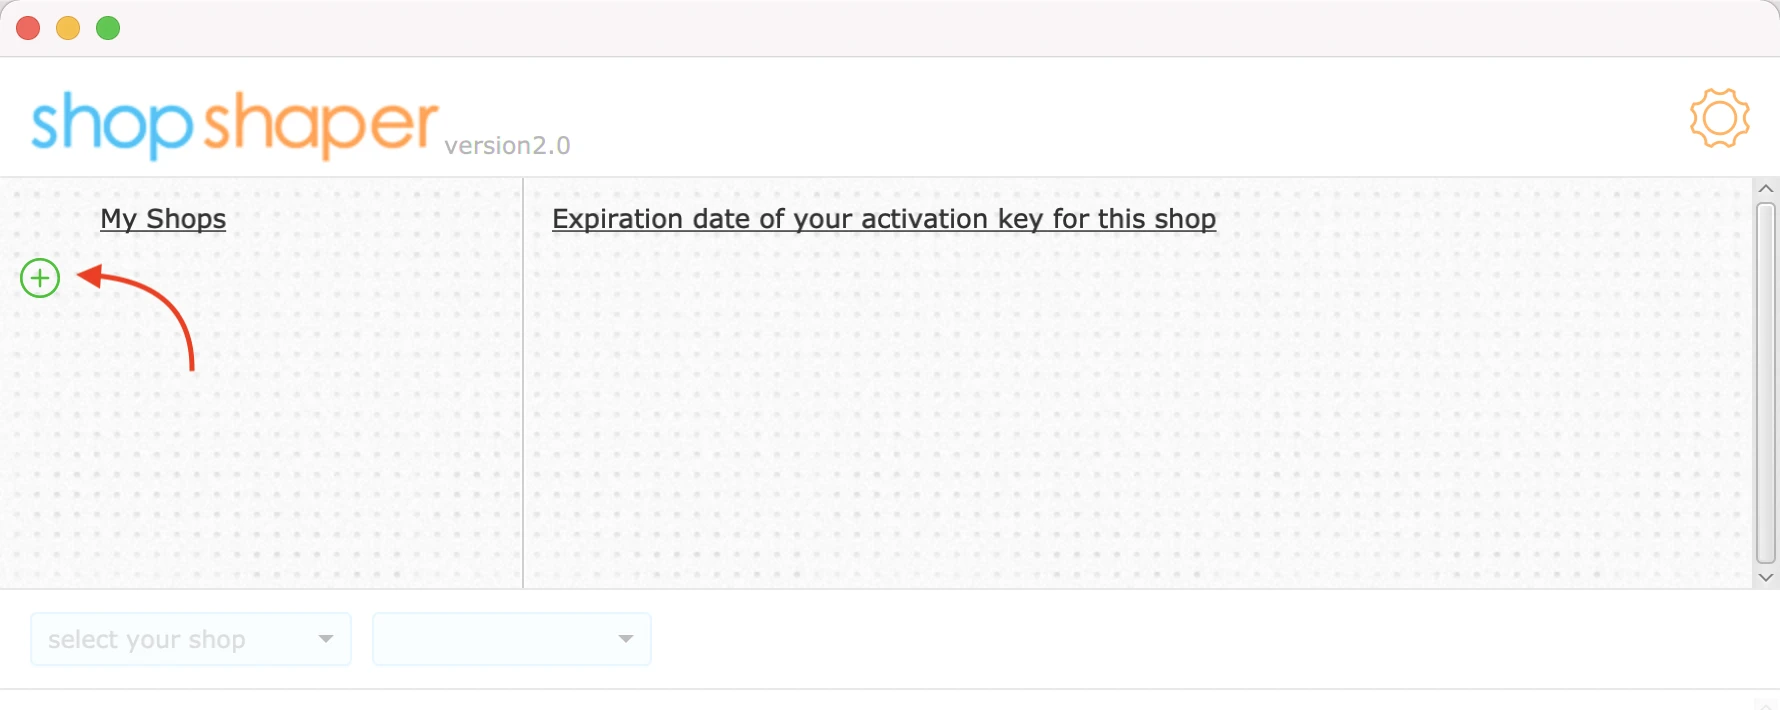
Open ShopShaper and click on the settings button.
2.
Click on the + button to add a shop.
3.
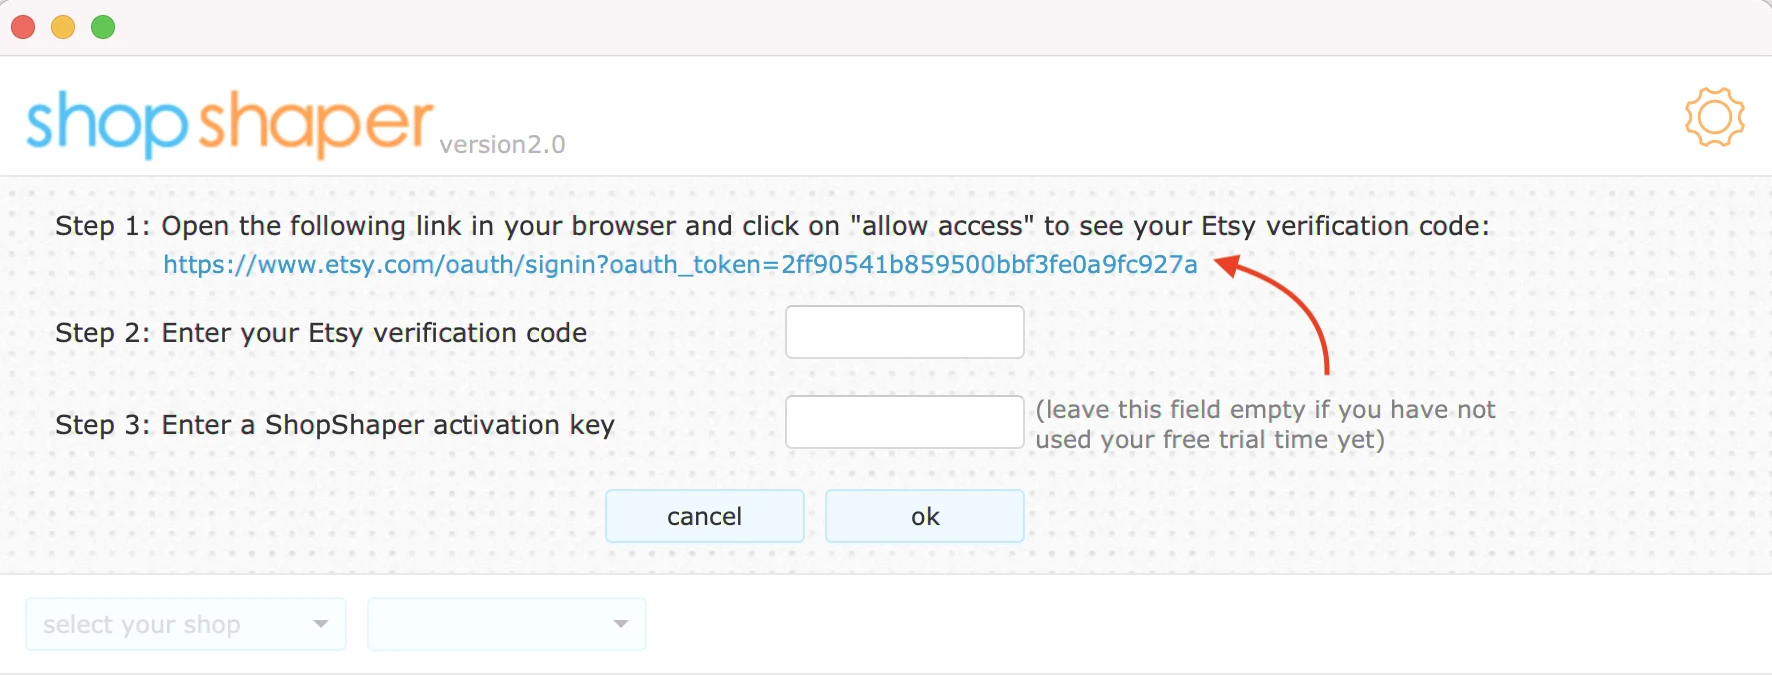
Click on the verification link. Your browser should automatically open the link. If not, copy the link and open it in your browser.
4.
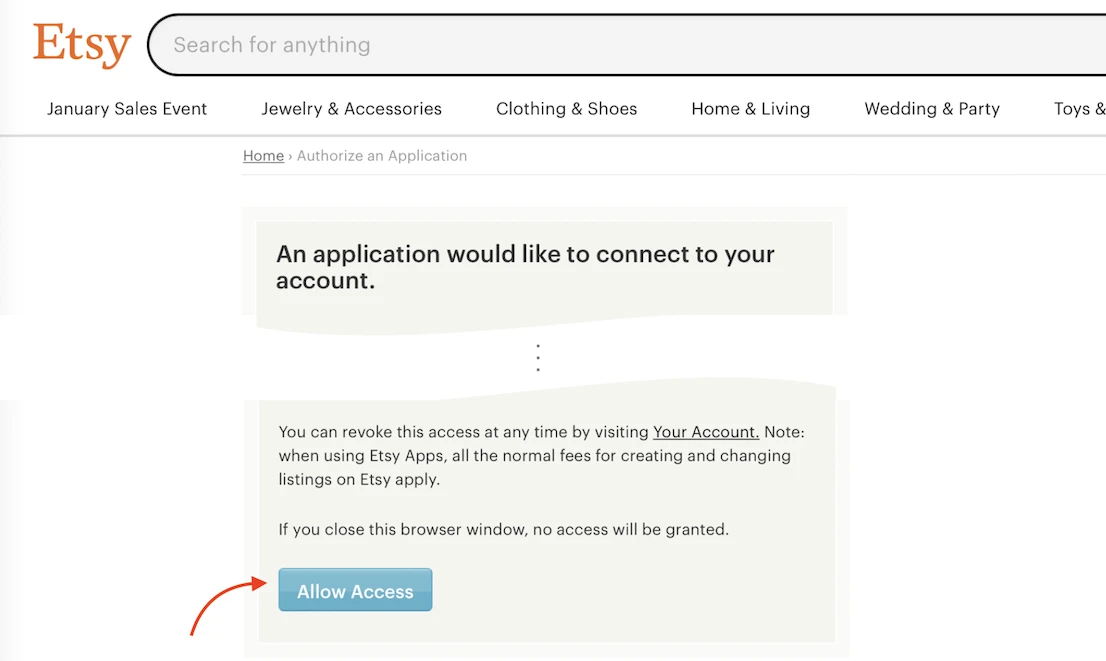
The verification link will bring you to Etsy's page where you are asked to give ShopShaper permission to access your listing information. Click on the "allow access" button to see the verification code.
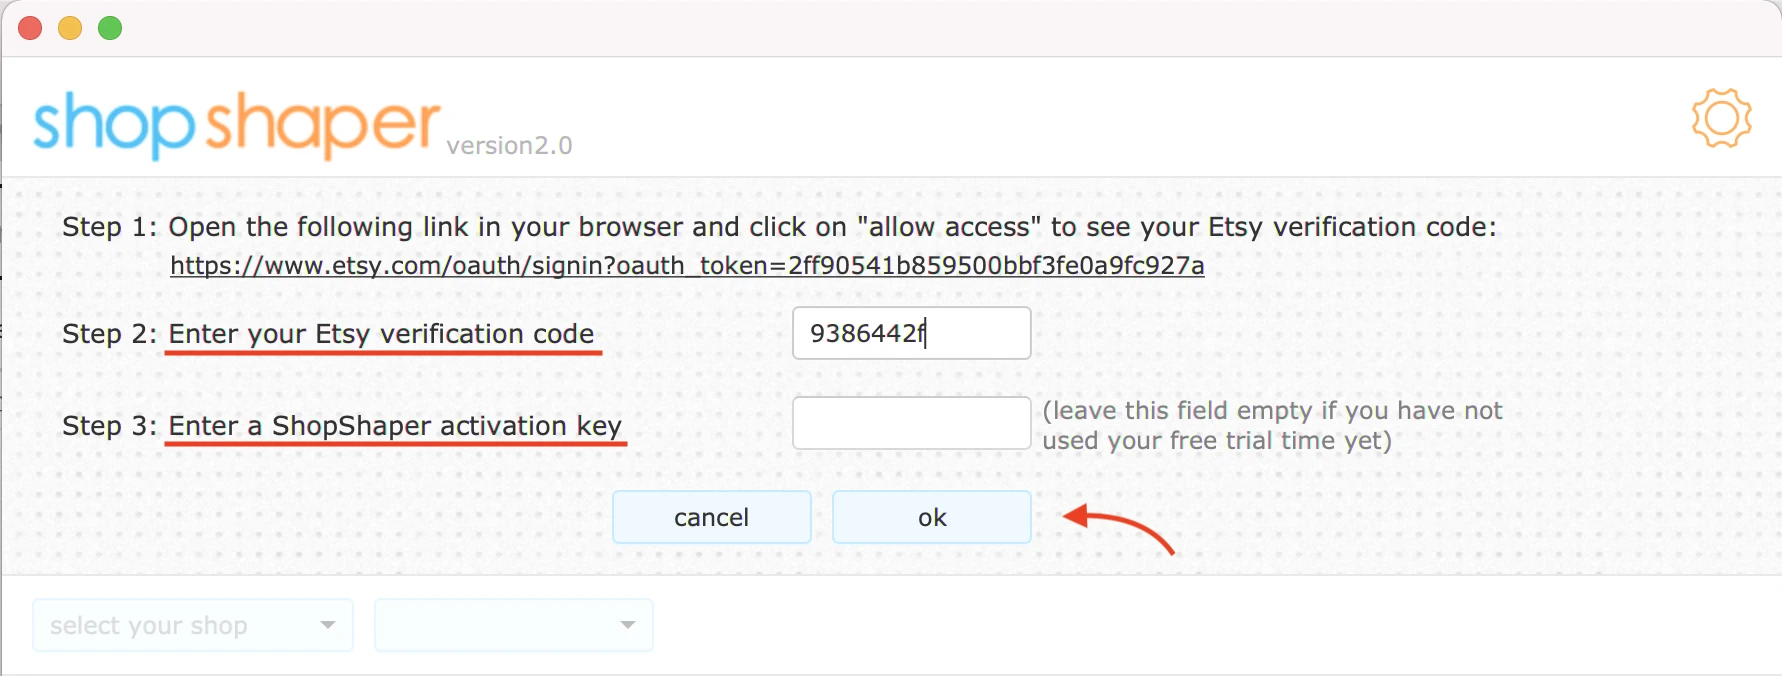
5.
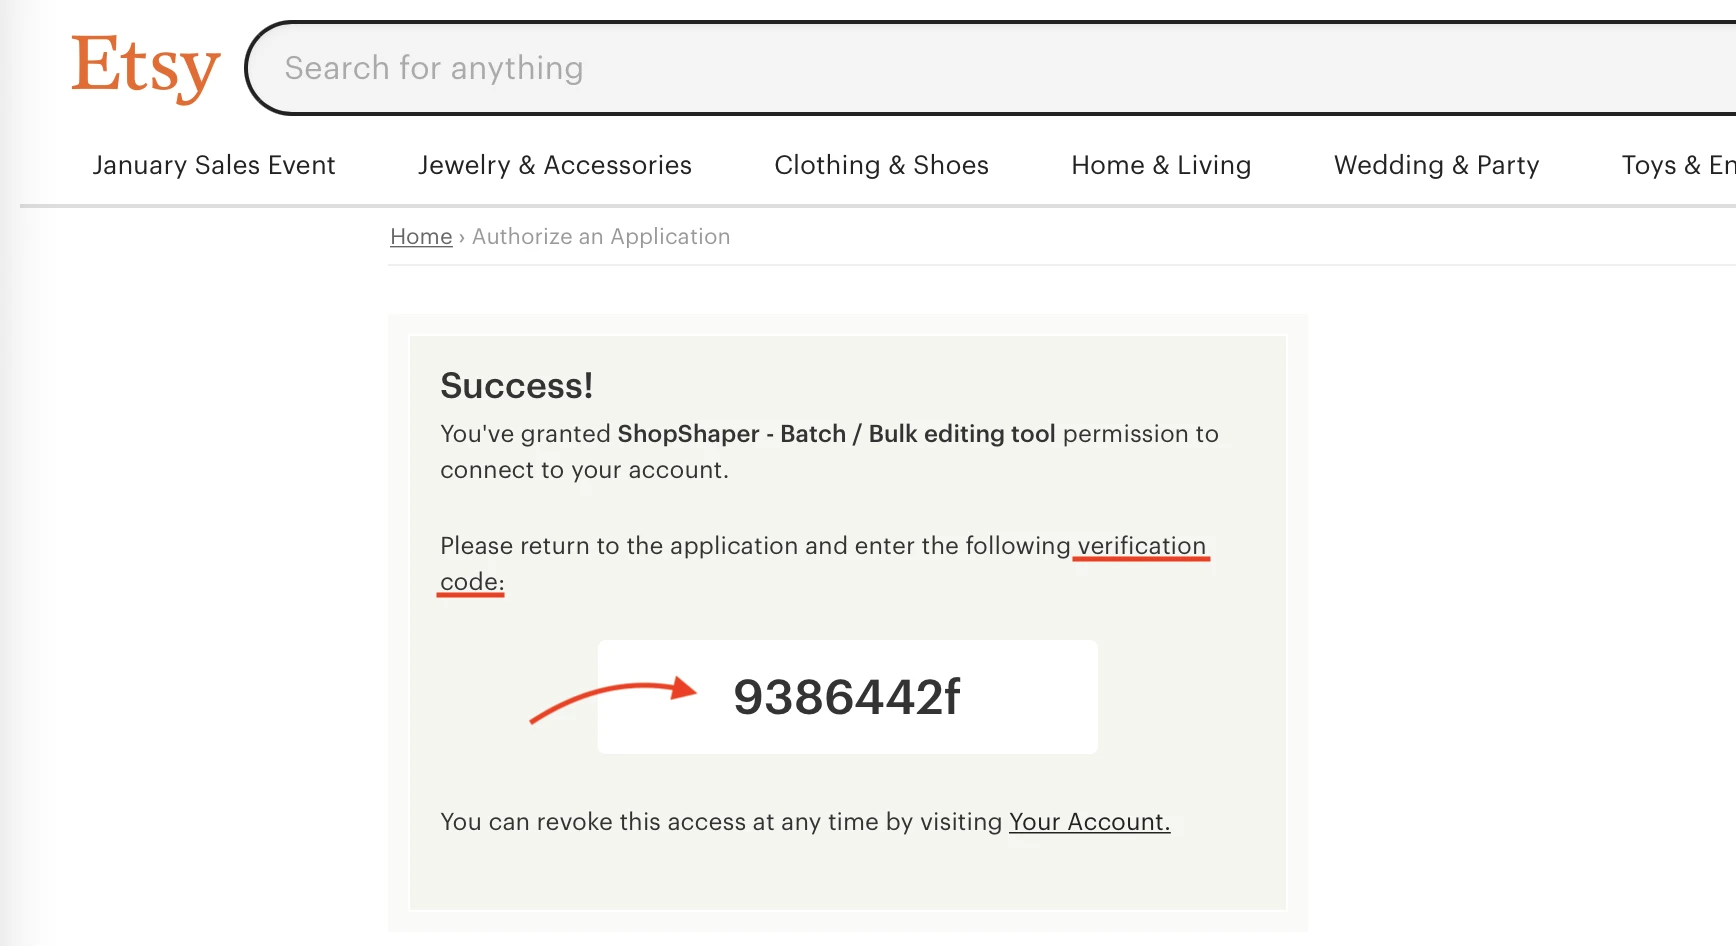
Note or copy the verification code.
6.
Enter the verification code and a purchased ShopShaper activation key and click on the ok button. If you haven't used your free trial time yet, leave the activation key field empty.
7.
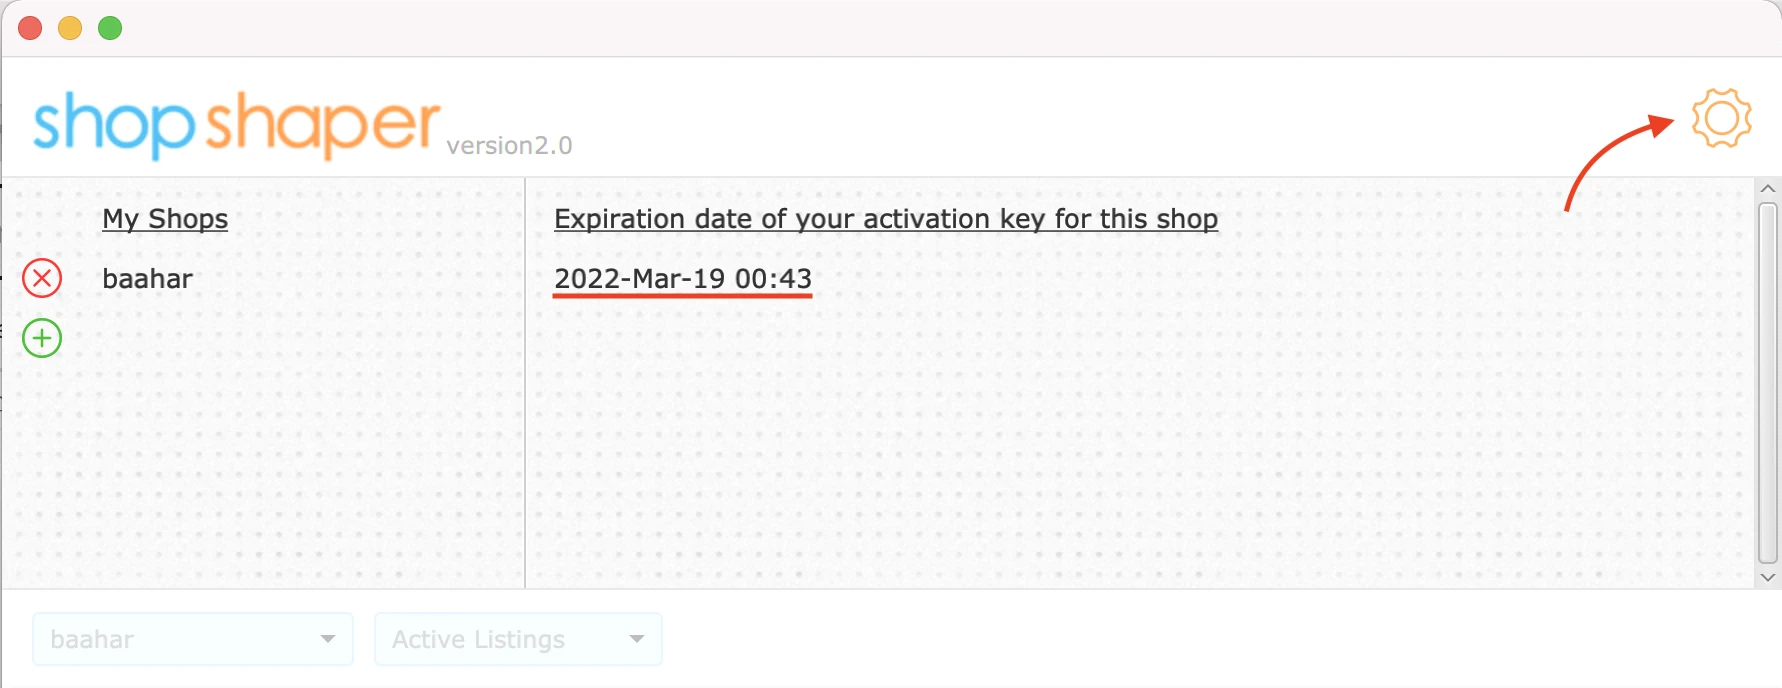
Your shop will appear under "My Shops". You can see when your activation key will expire. Click on the settings button again to close this view and to start using ShopShaper.
8.
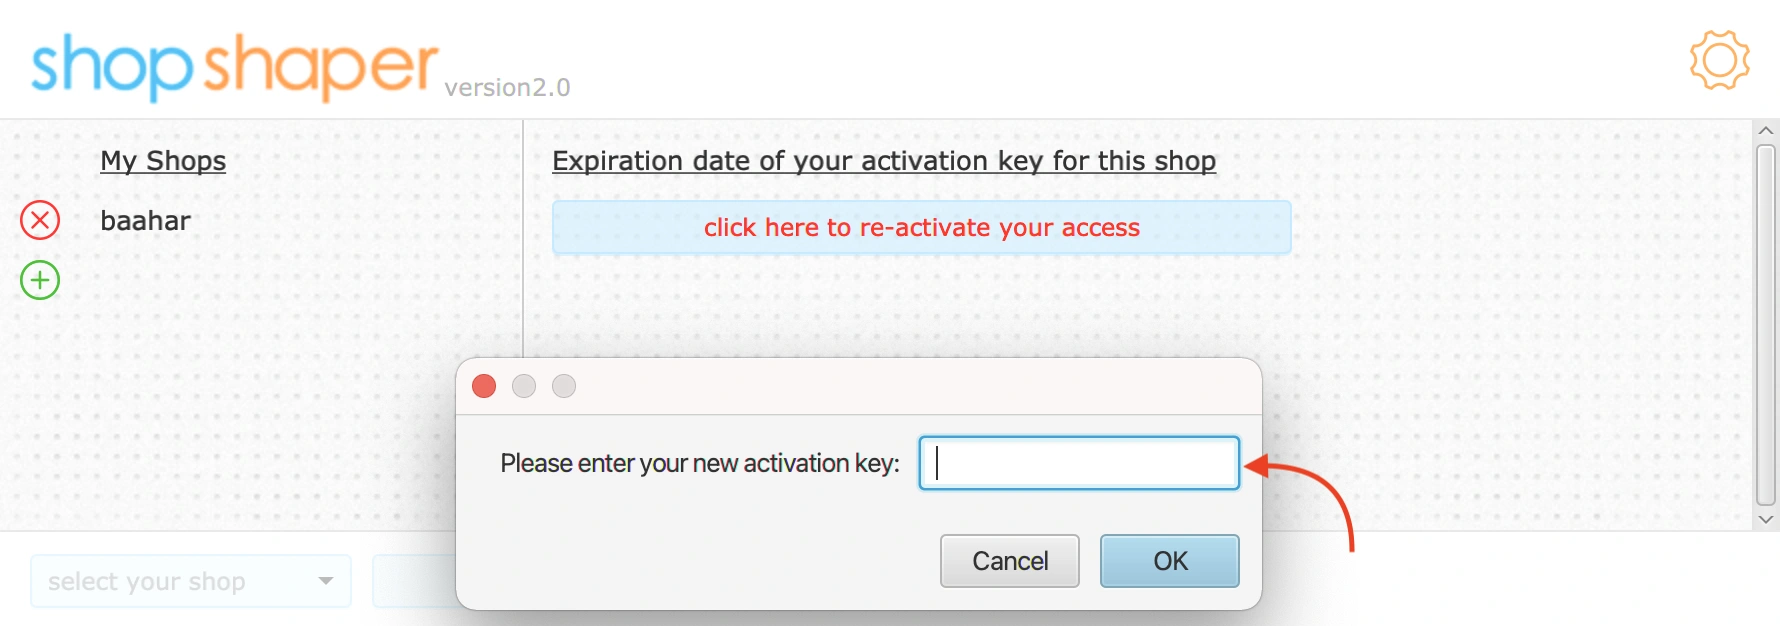
Once your ShopShaper activation key expires, you can click on the re-activate button and enter a new activation code.
1.
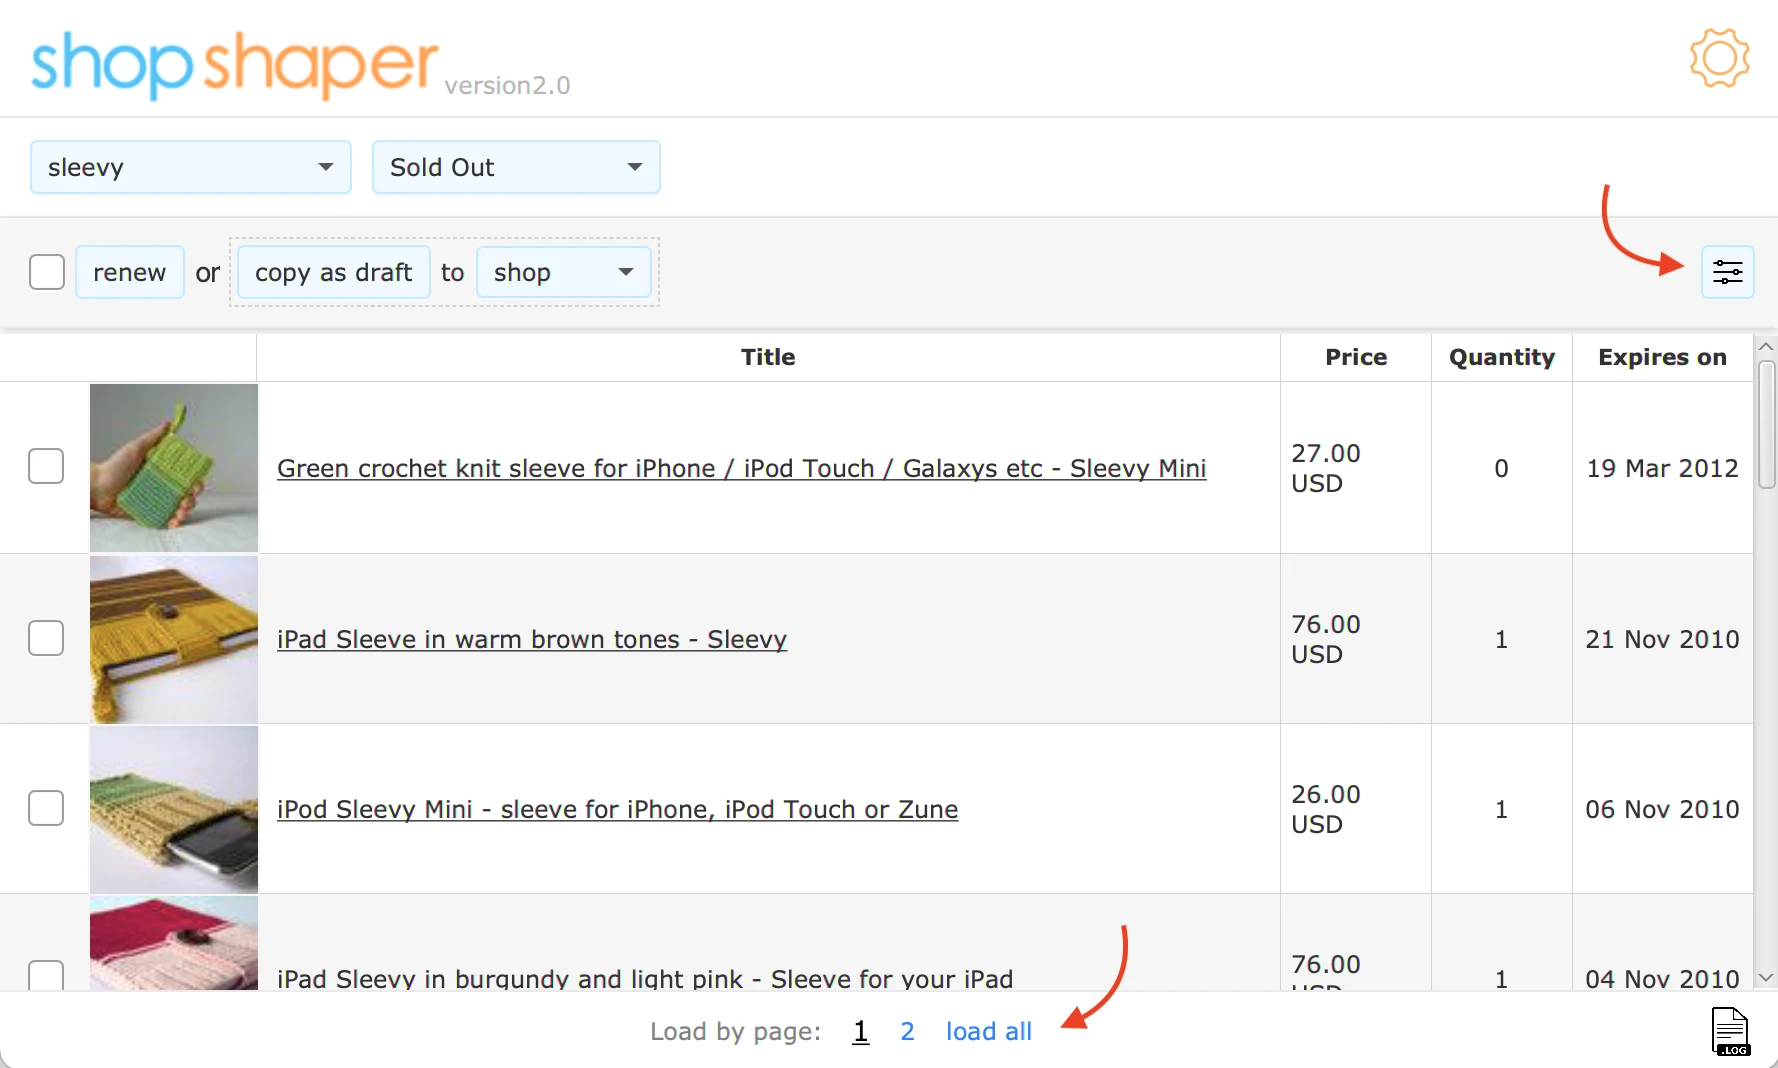
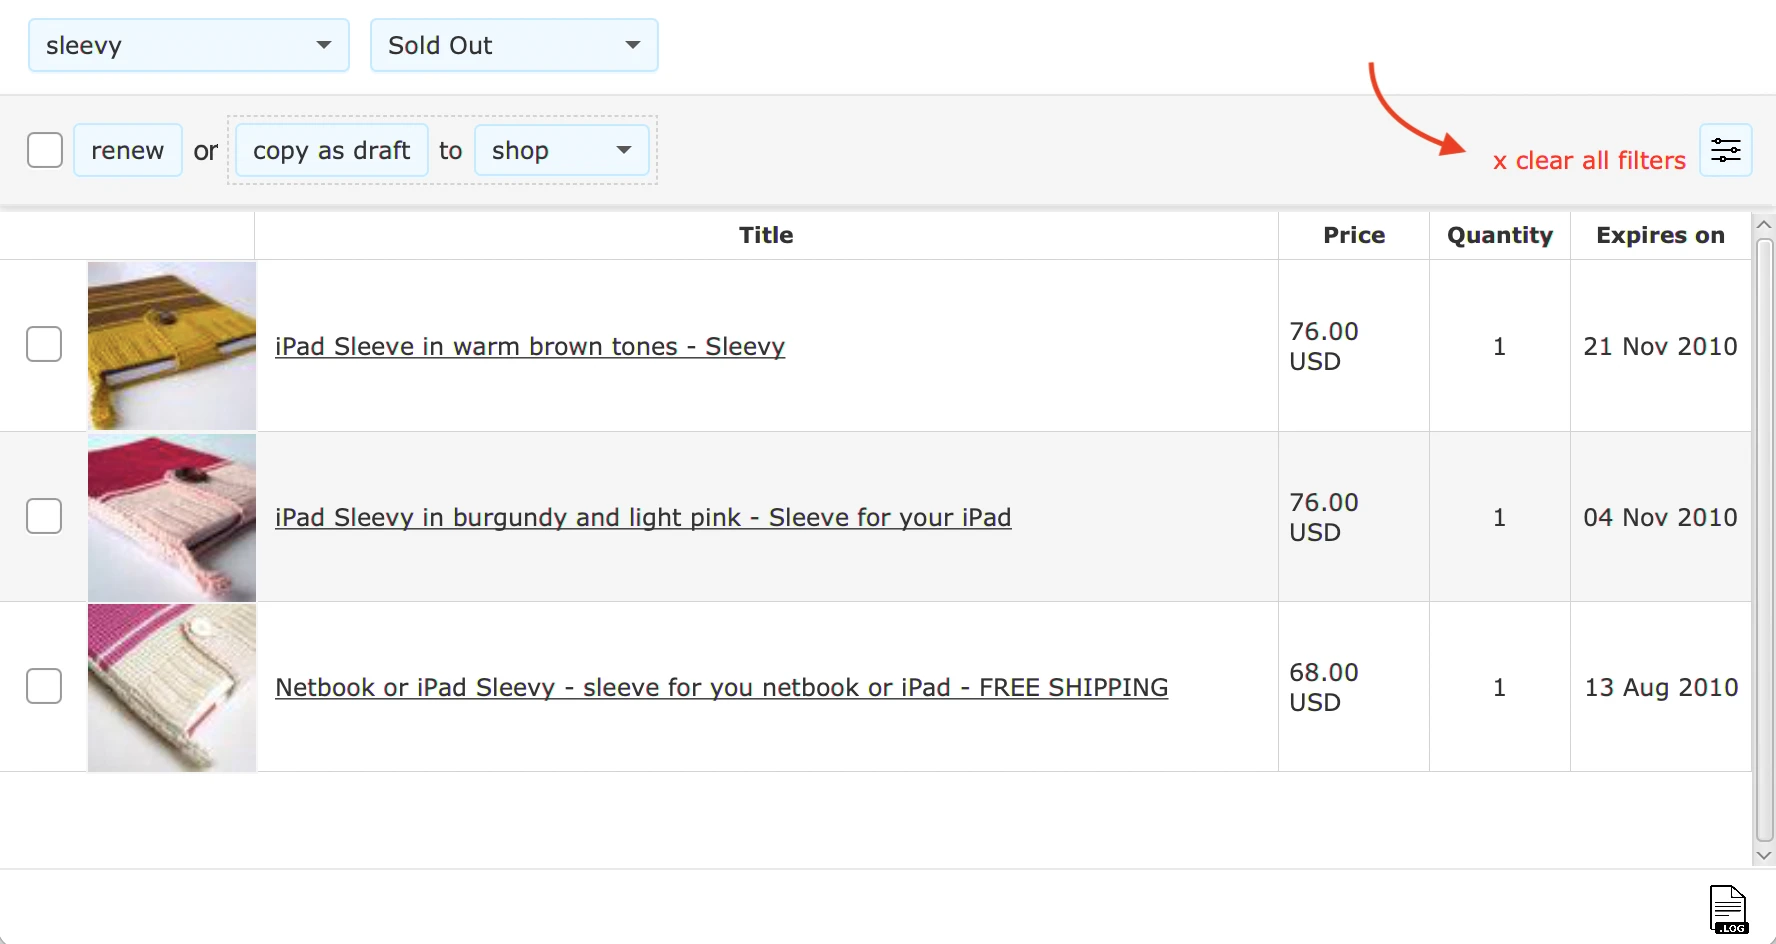
If you want to search among all of your sold out listings, click on the "load all" button. It may take some time for ShopShaper to load everything. Once the listings are loaded you can click on the filter button.
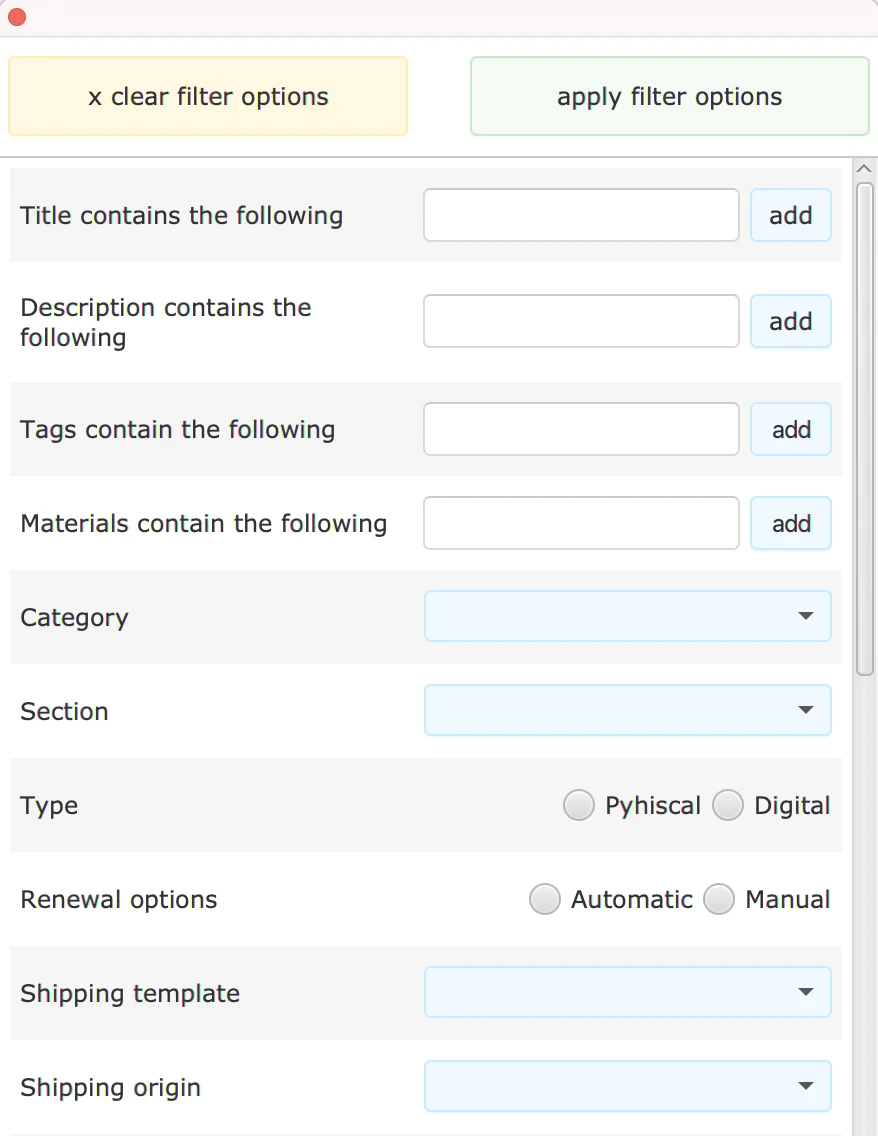
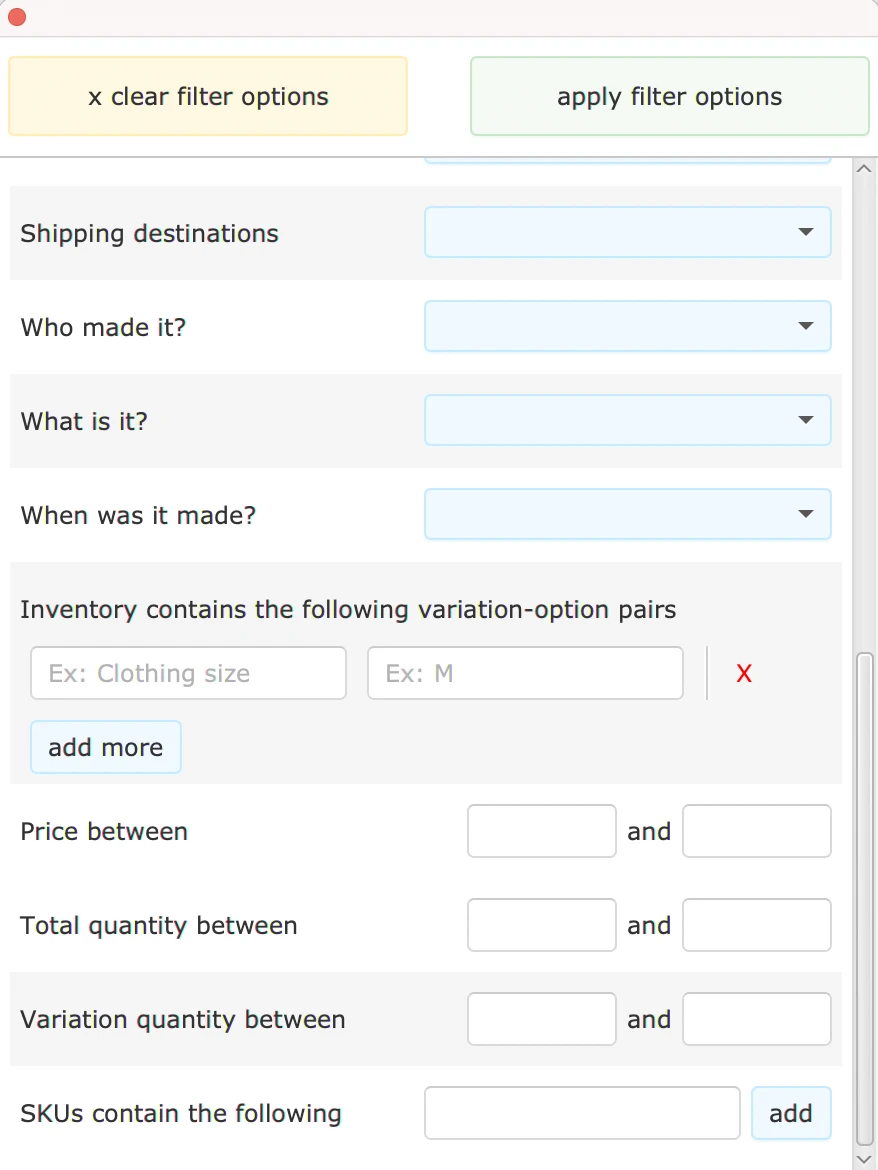
2.
In the filter view you can, for example, add tags and materials and then click on the "apply filter options" button to filter your listings that have those. This can take some time if you are filtering through a lot of listings.

3.
There are many more filter options that you can use. You can filter by price, shipping destination, etc.
4.
You can click on the "clear all filters" button, to return to your previously shown listings.
1.
Click the checkboxes of all the listings you want to edit it bulk and click the "edit selected listings" button.
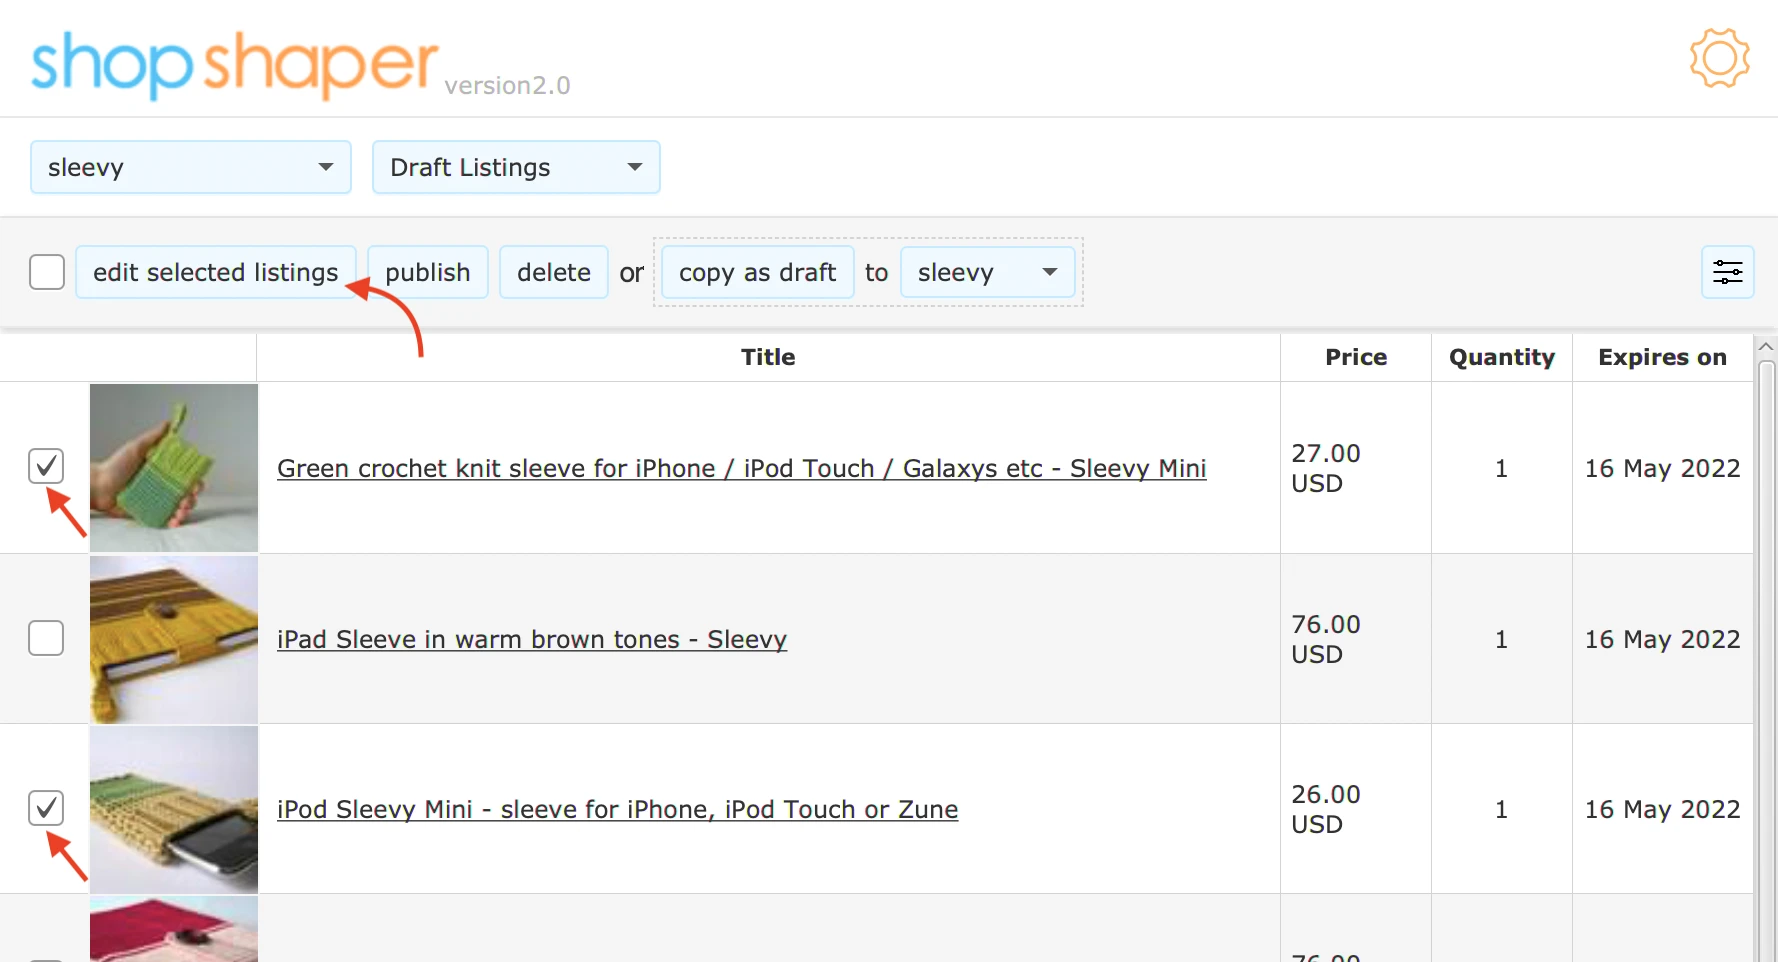
2.
You will see your selected listings at the top of the page and all the editing options below. You can still decide to exclude a listing from the batch edit and remove it from the list.

3.
You can edit everything about your listing. Let's start with adding a sale announcement to the front of the listing titles.

4.
Now on to reduce the price by 10%. If your listing has variations this will reduce the price of all options. If you should want to edit the prices of specific variation options see the how-to guide on that topic.
You can tell ShopShaper to round the computed price for you, so that your listings don't end up with prices like 26.574 USD.
After your sale is over, you can choose the same listings and revert the previous price reduction of 10%.

5.
You can click on the "preview" button to see whether the changes are to your liking. You can click on the "apply changes to selected listings" button and start the batch editing process.
You are advised to always try your edits first on one or a few listings and to go on with the rest once you are satisfied with the results.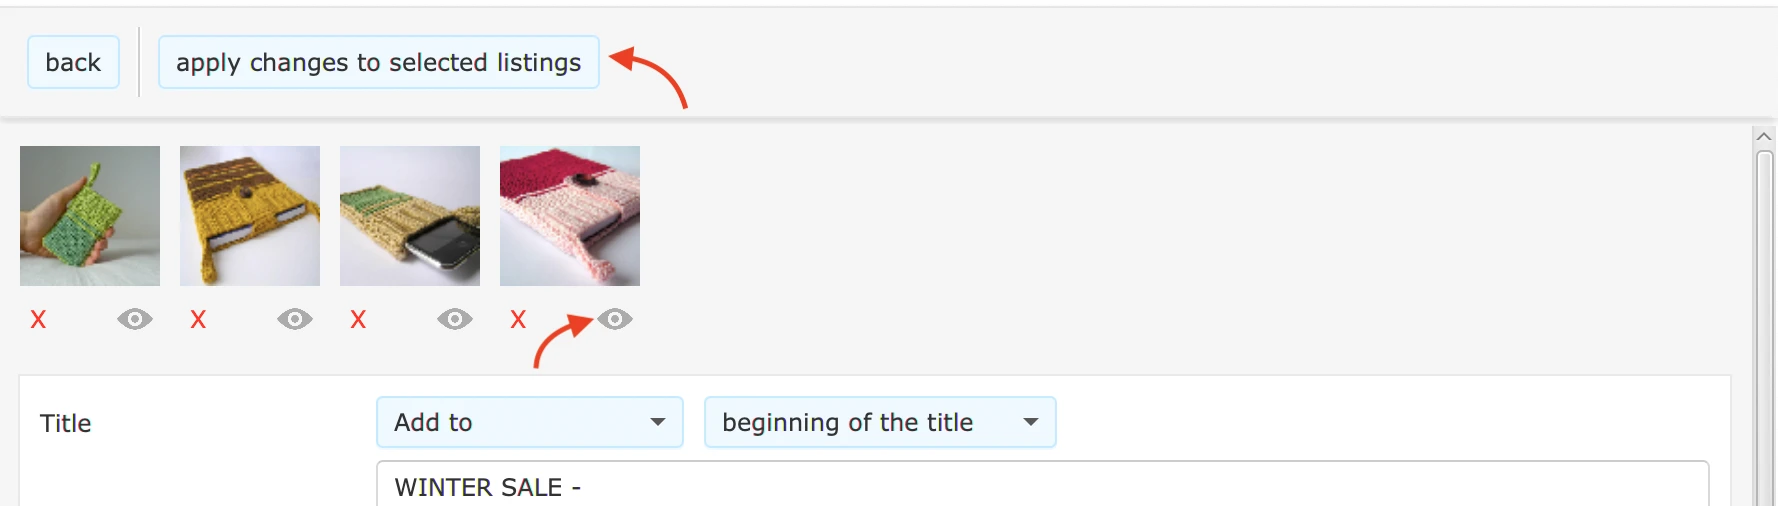
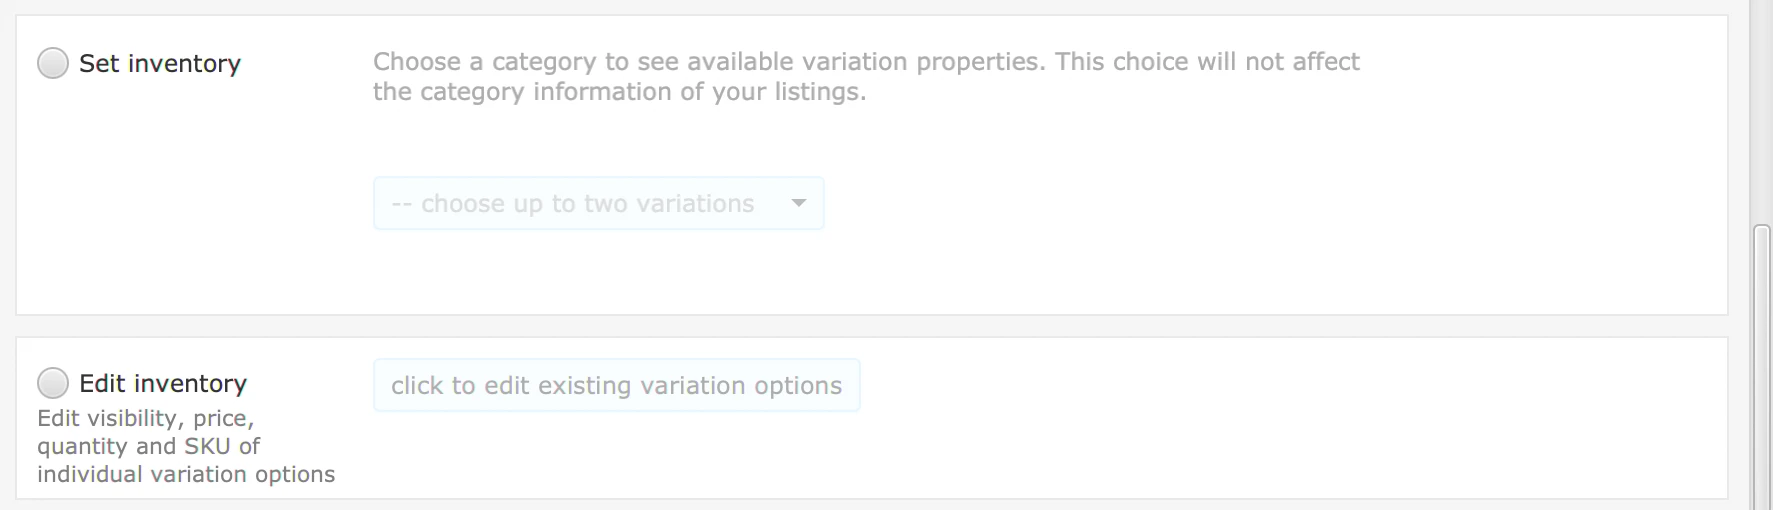
1.
On the batch edit page, you can either replace your listings' variation options by choosing "set inventory" or you can edit existing variation options by choosing "edit inventory".
2.
Let's assume you want to replace your listings's existing variation options.
First, you will have to choose a rough category so that variation properties for that category come up. This selection has no effect on the category of the listings itself.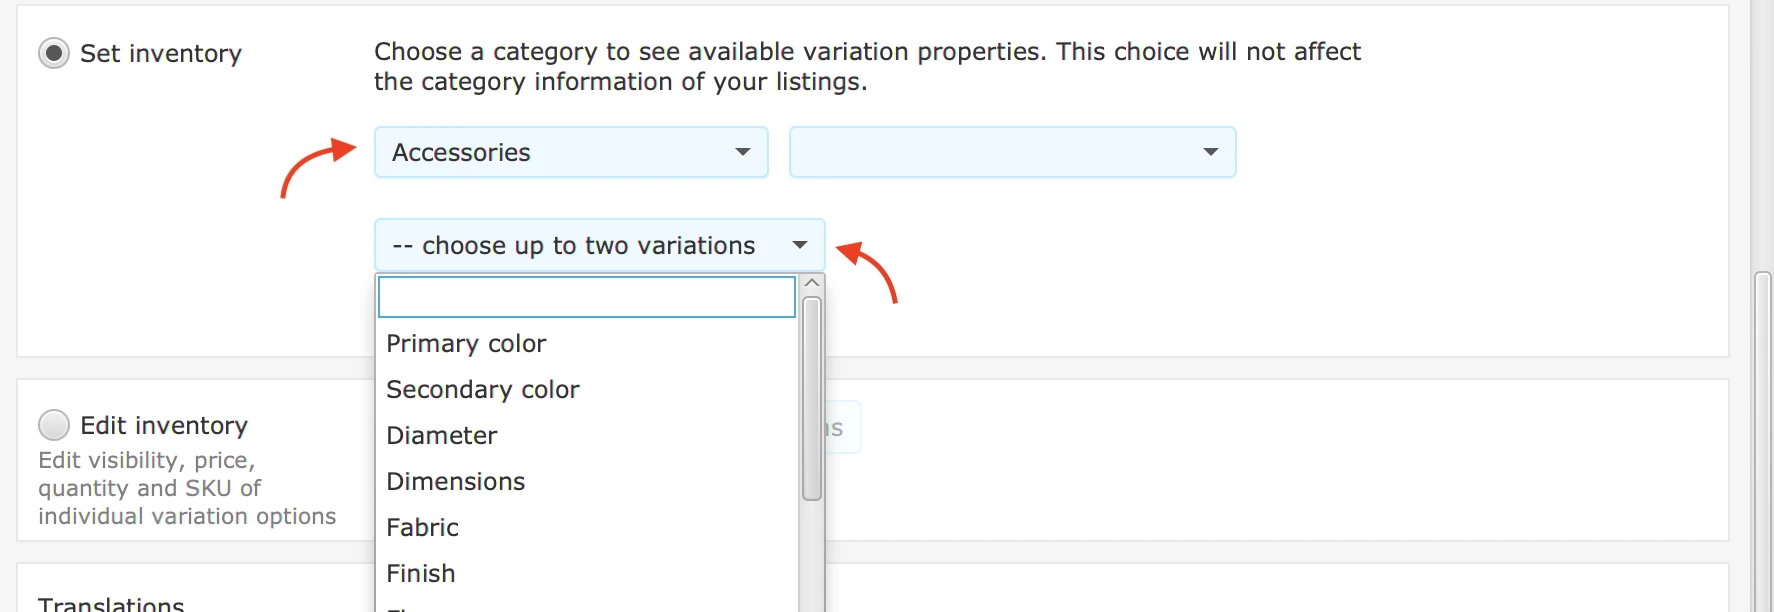
Now you can enter your desired options. For example, you may want to offer products that have the primary color options "rose pink" and "teal", and the material options "cotton" and "linen".
When you add those options you will see the possible combinations of products. You can enter price, quantity, SKU information and indicate whether that option is available or not. For example, you may have all the options in stock except the linen one in teal.
If several of your options have the same price or quantity, you can select them and change their values at once by clicking on the "edit" button.

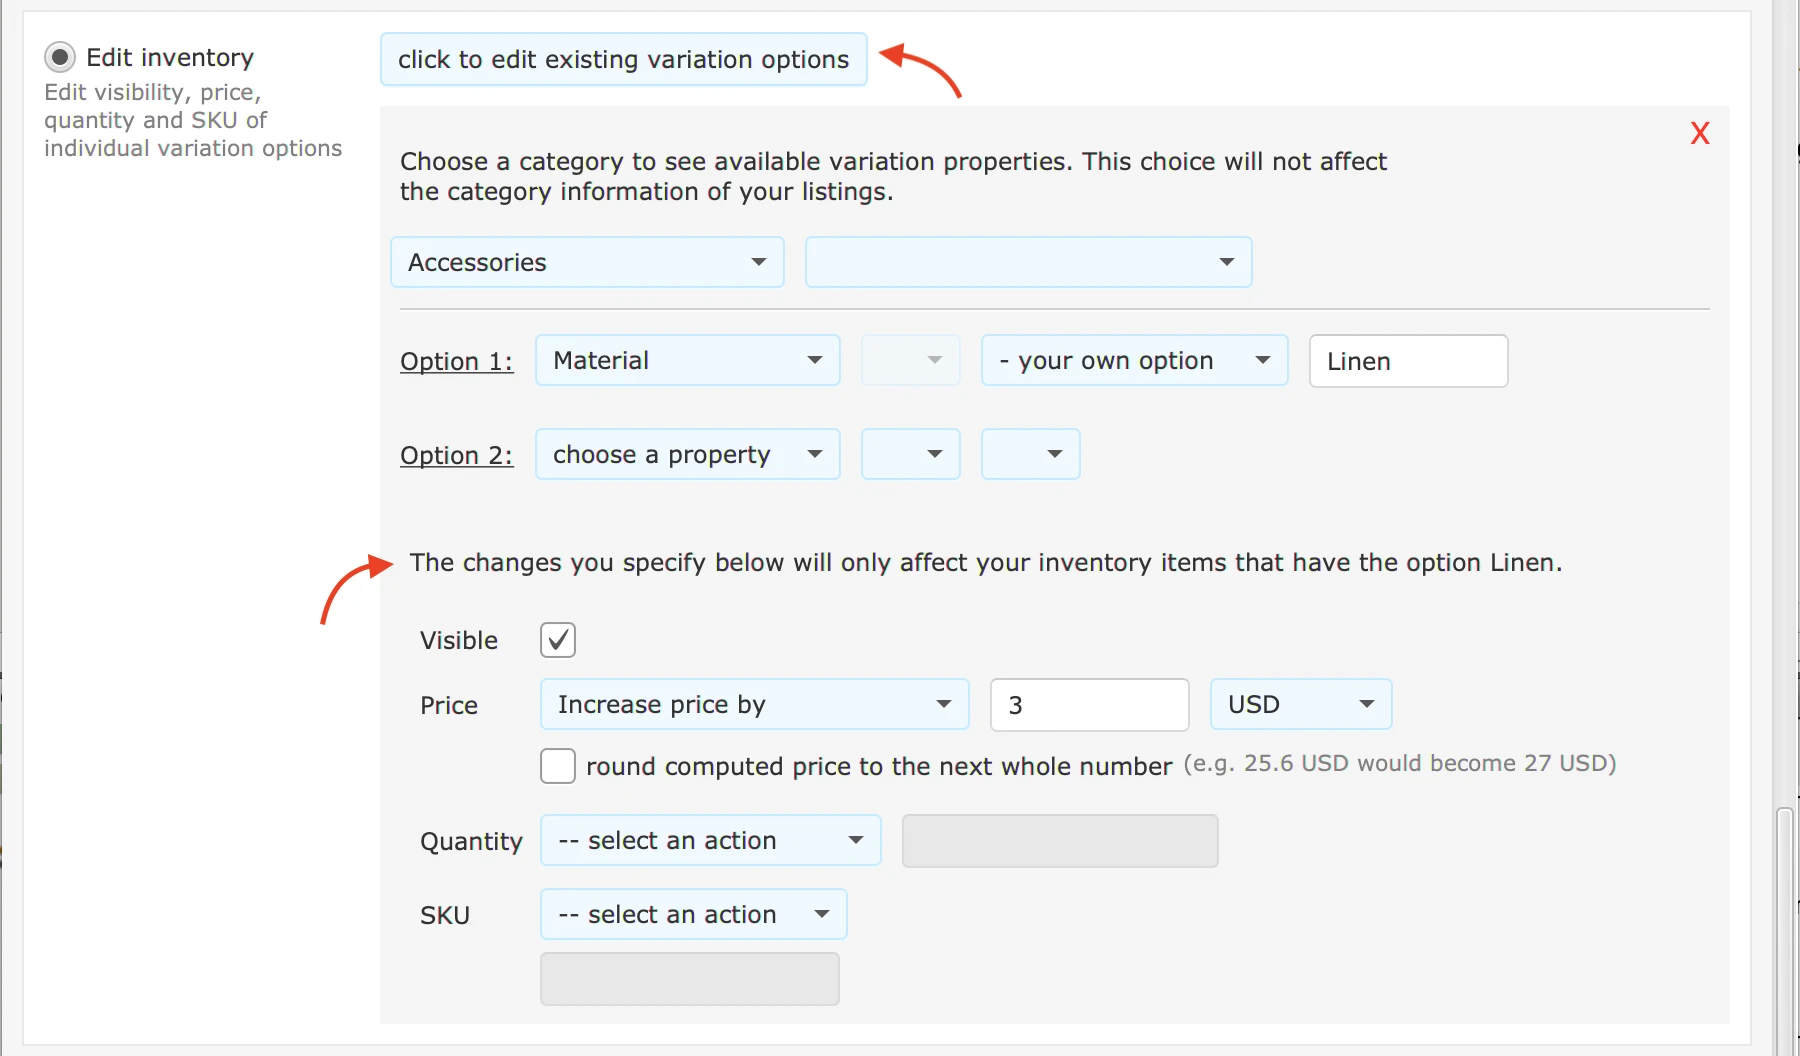
3.
Let's assume your fabric supplier increased some prices and you have to reflect that in your product prices where you use linen, whilst keeping the product prices where you use cotton as they are. For that you can click on the "edit existing variation options" button.First, you will have to choose a rough category so that variation properties for that category come up. This selection has no effect on the category of the listings itself.
Then you can select the option for which you want to make changes, in this case material. We could also choose to edit a specific combination, such as linen and rose pink as well, but right now we want that all the product prices where linen is used get increased
4.
You can click on the "preview" button to see whether the changes are to your liking. You can click on the "apply changes to selected listings" button and start the batch editing process.
You are advised to always try your edits first on one or a few listings and to go on with the rest once you are satisfied with the results.
1.
On the batch edit page, you can either choose a shipping profile for all the selected listings, set shipping options to be applied to all the selected listings", or edit specific parts of the listings' shipping information.

2.
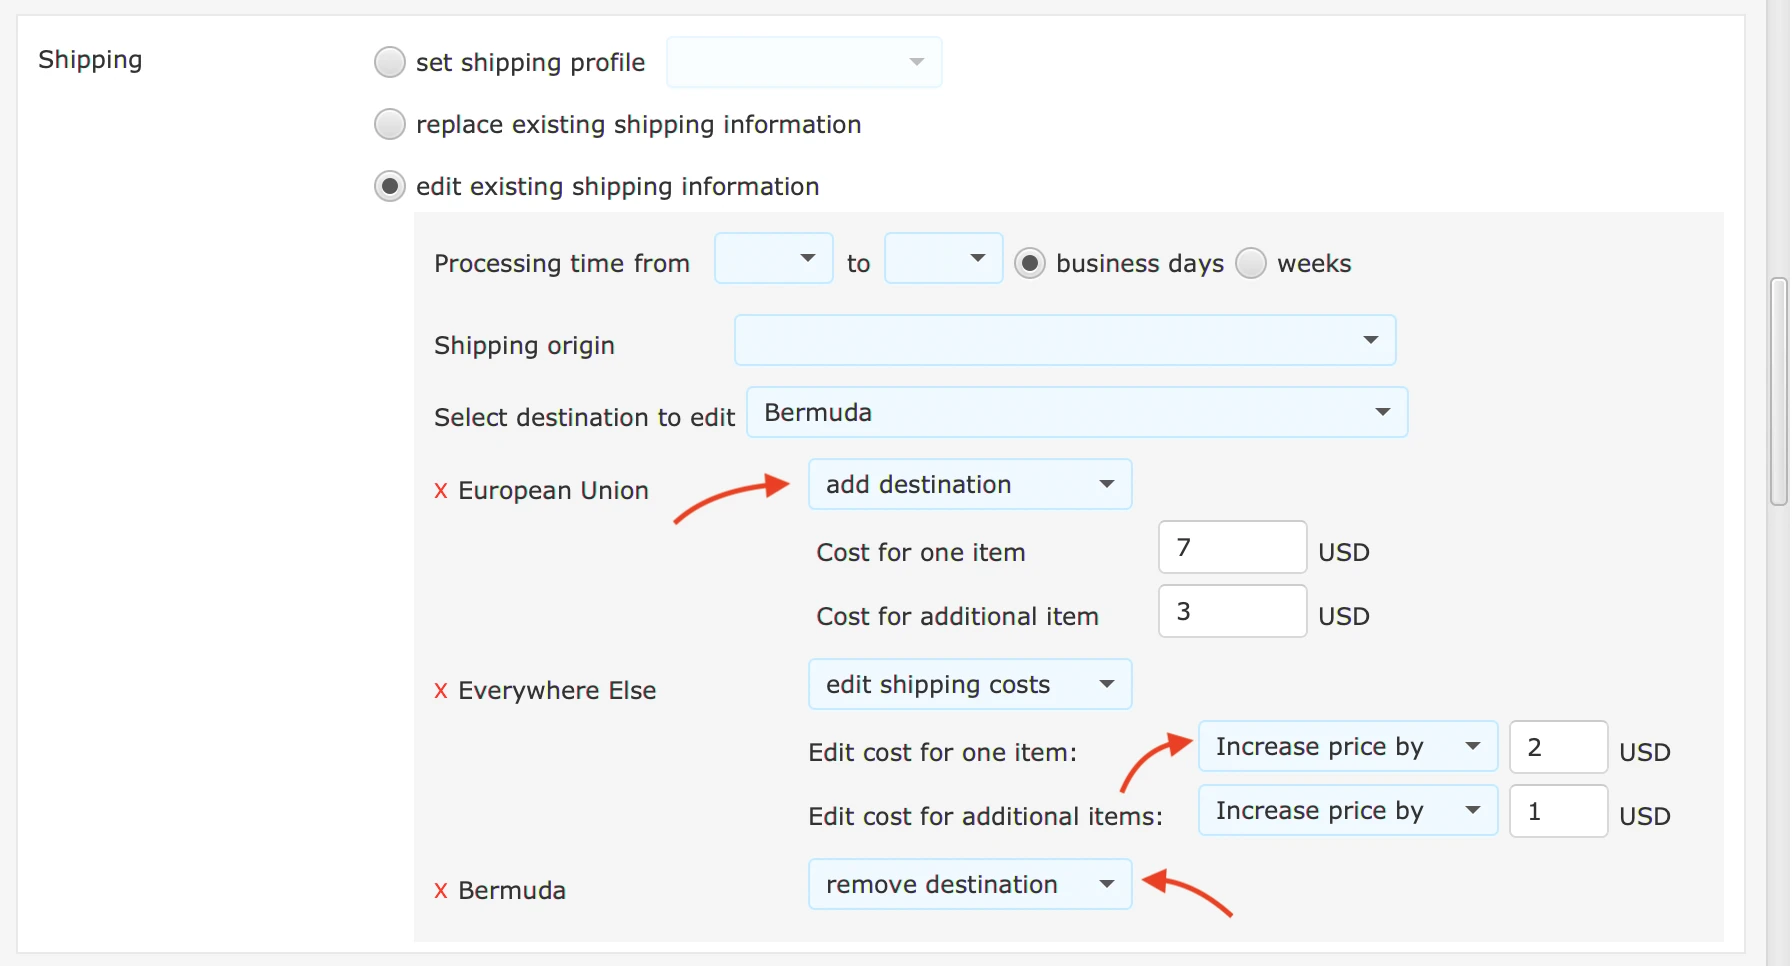
Let's assume you want to add the European Union to your listings' existing destinations, want to increase the shipping cost for the everywhere else destination, and for some reason want to remove Bermuda from your destinations.
3.
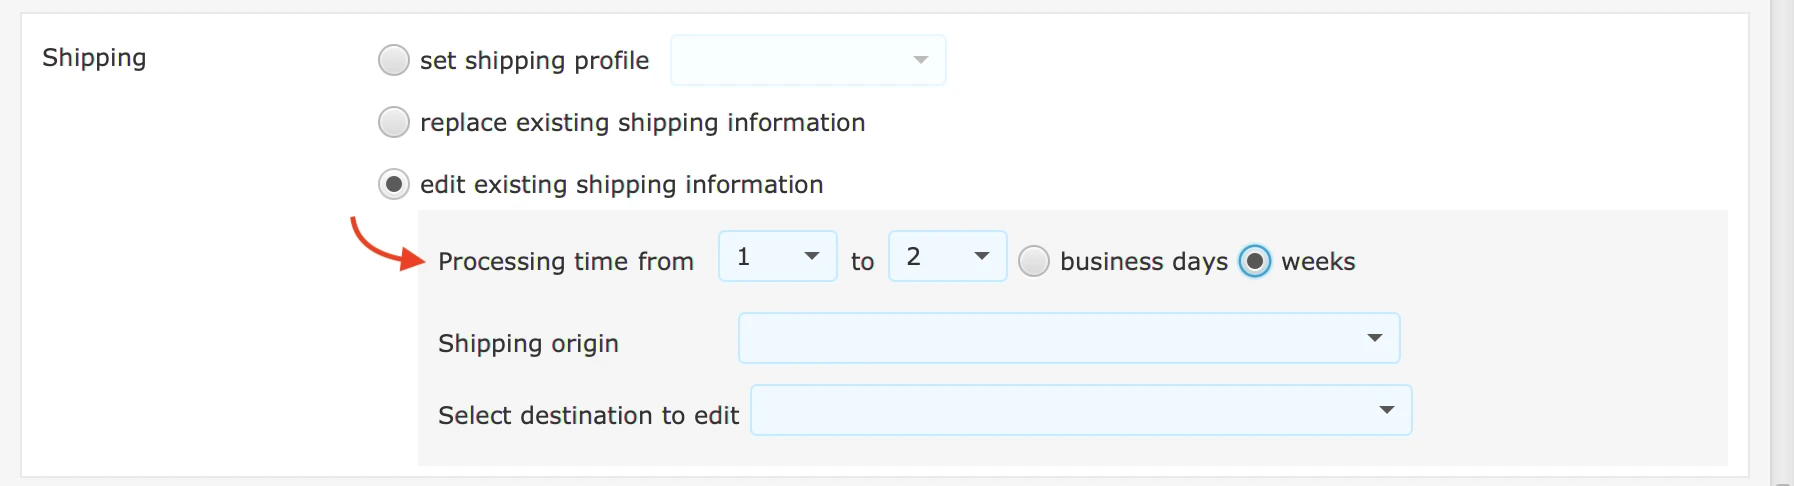
Let's assume you want to change the processing times of all the selected listings, whilst everything else remains the same.
4.
You can click on the "preview" button to see whether the changes are to your liking. You can click on the "apply changes to selected listings" button and start the batch editing process.
You are advised to always try your edits first on one or a few listings and to go on with the rest once you are satisfied with the results.
1.
Let's assume you want to copy a few of your expired listings. You could either want to make copies of them as draft listings in the same shop or in another one of your shops. First, select the shop you want to copy to and click on the "copy as draft" button.
If you copy listings that are older, it can be that they do not contain necessary information as per Etsy's updates. In that case you will get an error message that the listing could not be copied. You can click on those listings individually, make the necessary adjustments and copy them as described in step 2.

2.
You could also be editing a single listing and want to make a copy of it in the same shop or in another one of your shops. First, select the shop you want to copy to and click on the "copy as draft" button.
